
84 lines
12 KiB
Markdown
84 lines
12 KiB
Markdown
|
||
|
||
`GParted` 是一款适用于 `Linux` 的图形化磁盘分区管理工具,通过它可以便捷地为 `VMware` 中的 `Ubuntu Desktop` 增大磁盘空间。然而你可能正在使用 `Ubuntu Server`,并不想要安装或并不被允许安装图形化界面,本文介绍了如何在不使用 `GParted` 的情况下,通过命令行使用自带的工具为 `VMware` 中的 `Ubuntu Server` 增大磁盘空间。
|
||
|
||
> 请注意辨别磁盘空间是真的接近耗尽,而不是在系统安装时只真正使用了大约一半空间。参见 [Ubuntu server 20.04 安装后没有分配全部磁盘空间](https://www.moralok.com/2023/06/24/Ubuntu-server-20-04-not-all-disk-space-was-allocated-after-installation/ "Ubuntu server 20.04 安装后没有分配全部磁盘空间")
|
||
|
||
## [](https://www.moralok.com/2024/01/14/increase-disk-space-of-Ubuntu-server-on-VMware-without-using-GParted/#%E8%83%8C%E6%99%AF%E4%BB%8B%E7%BB%8D "背景介绍")背景介绍
|
||
|
||
环境如下:
|
||
|
||
- VMware® Workstation 17 Pro 17.5.0 build-22583795
|
||
- Ubuntu 20.04.6 LTS (GNU/Linux 5.4.0-169-generic x86_64)
|
||
|
||
尽管最初按照心理预期为 `Ubuntu Server` 分配了 `50G` 的磁盘空间,主要用于运行一些 `Docker` 容器,但是不知不觉之间发现磁盘空间的占用率还是上升到了 `90%`。一时之间想不到可以清理什么,决定先增大一些磁盘空间。
|
||
|
||
- 使用 `df -h` 命令显示文件系统的总空间和可用空间信息。可知 `/dev/mapper/ubuntu--vg-ubuntu--lv` 已使用 `95%`。
|
||
|
||
$ df -h <br>Filesystem Size Used Avail Use% Mounted on <br>udev 7.8G 0 7.8G 0% /dev <br>tmpfs 1.6G 3.0M 1.6G 1% /run <br>/dev/mapper/ubuntu--vg-ubuntu--lv 48G 43G 2.5G 95% / <br>tmpfs 7.8G 0 7.8G 0% /dev/shm <br>tmpfs 5.0M 0 5.0M 0% /run/lock <br>tmpfs 7.8G 0 7.8G 0% /sys/fs/cgroup <br>vmhgfs-fuse 932G 859G 73G 93% /mnt/hgfs <br>/dev/sda2 2.0G 209M 1.6G 12% /boot <br>/dev/loop0 64M 64M 0 100% /snap/core20/2015 <br>/dev/loop1 64M 64M 0 100% /snap/core20/2105 <br>/dev/loop2 41M 41M 0 100% /snap/snapd/20290 <br>/dev/loop3 92M 92M 0 100% /snap/lxd/24061 <br>/dev/loop4 41M 41M 0 100% /snap/snapd/20671 <br>tmpfs 1.6G 0 1.6G 0% /run/user/1000|
|
||
|
||
|
||
## [](https://www.moralok.com/2024/01/14/increase-disk-space-of-Ubuntu-server-on-VMware-without-using-GParted/#%E8%A7%A3%E5%86%B3%E6%AD%A5%E9%AA%A4 "解决步骤")解决步骤
|
||
|
||
### [](https://www.moralok.com/2024/01/14/increase-disk-space-of-Ubuntu-server-on-VMware-without-using-GParted/#%E8%B0%83%E6%95%B4%E8%99%9A%E6%8B%9F%E7%A3%81%E7%9B%98%E5%A4%A7%E5%B0%8F "调整虚拟磁盘大小")调整虚拟磁盘大小
|
||
|
||
> 不论如何,需要先修改 `VMware` 的相关设置。
|
||
|
||
1. 先将客户机 `Ubuntu server` 关机
|
||
2. 然后通过“虚拟机设置 -> 硬盘 -> 扩展 -> 最大磁盘大小”将最大虚拟磁盘大小设置为目标值(`50G -> 80G`)
|
||
3. 根据提示可知,在 `VMware` 中的扩展操作仅增大虚拟磁盘的大小,分区和文件系统的大小不受影响。你必须从客户机操作系统内部对磁盘重新进行分区和扩展文件系统。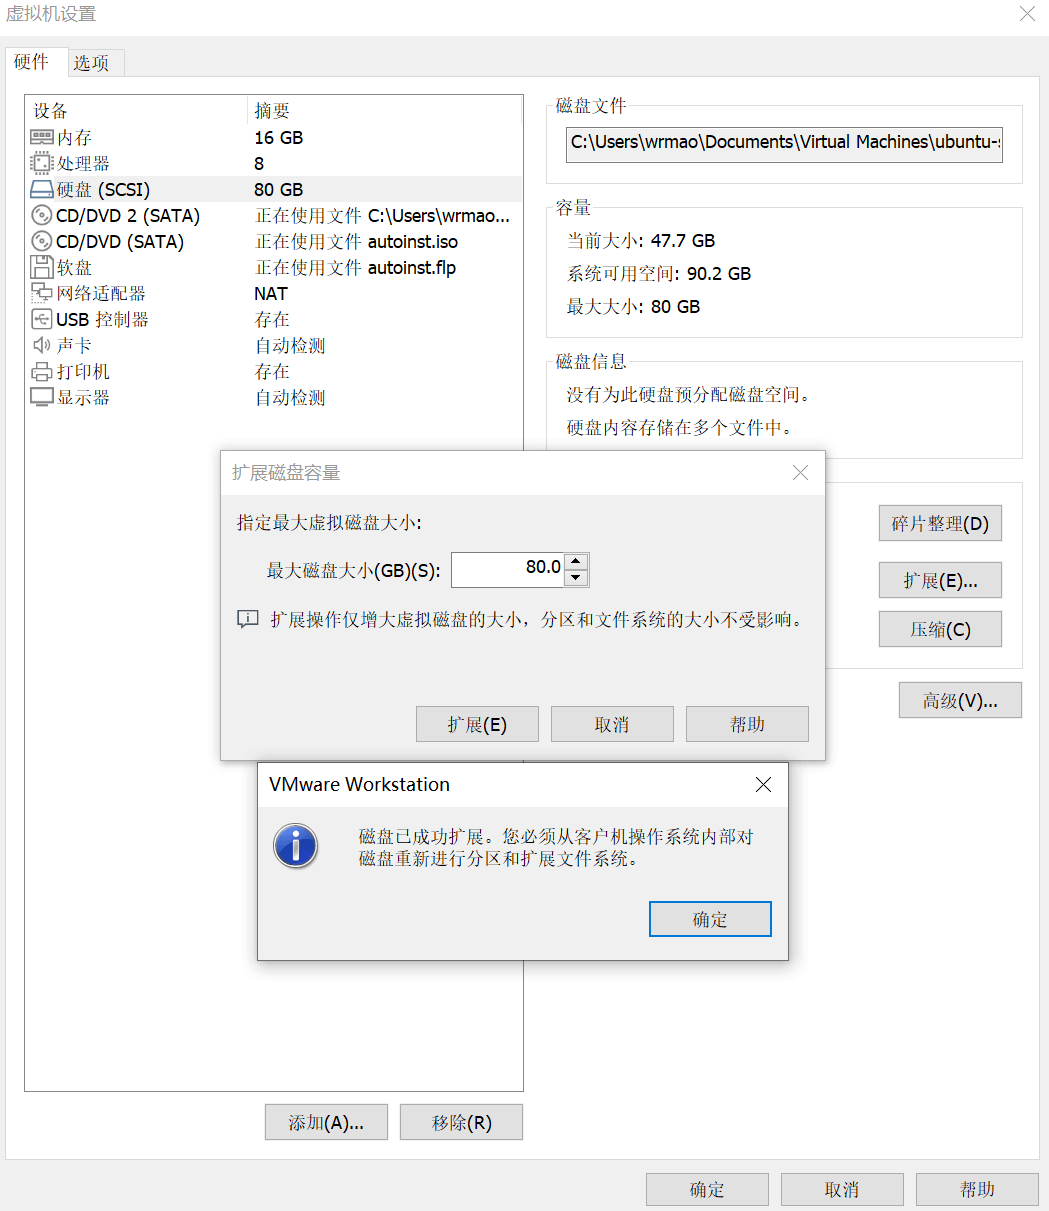
|
||
|
||
### [](https://www.moralok.com/2024/01/14/increase-disk-space-of-Ubuntu-server-on-VMware-without-using-GParted/#%E8%B0%83%E6%95%B4%E5%88%86%E5%8C%BA%E5%A4%A7%E5%B0%8F "调整分区大小")调整分区大小
|
||
|
||
#### [](https://www.moralok.com/2024/01/14/increase-disk-space-of-Ubuntu-server-on-VMware-without-using-GParted/#%E5%88%86%E5%8C%BA%E7%AE%A1%E7%90%86 "分区管理")分区管理
|
||
|
||
1. 使用 `sudo cfdisk` 命令进入分区管理的交互式界面。可知可用空间为新增的 `30G`。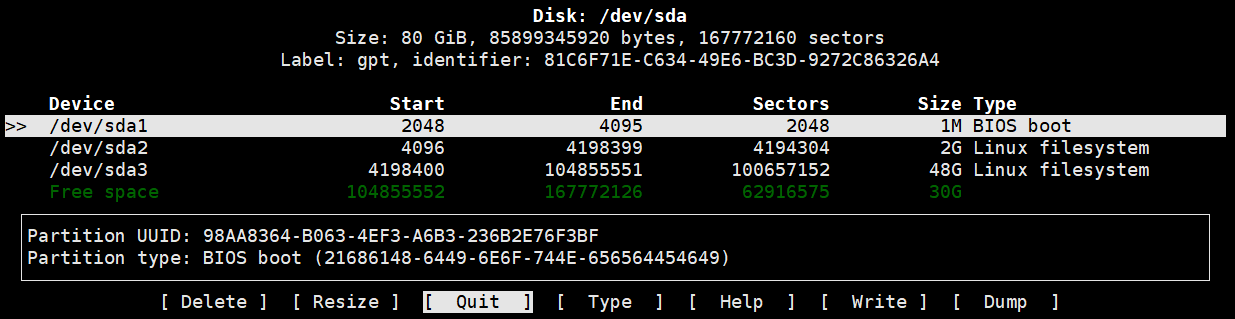
|
||
2. 使用上下方向键选择准备调整大小的分区 `/dev/sda3`,使用左右方向键选择 `Resize` 操作。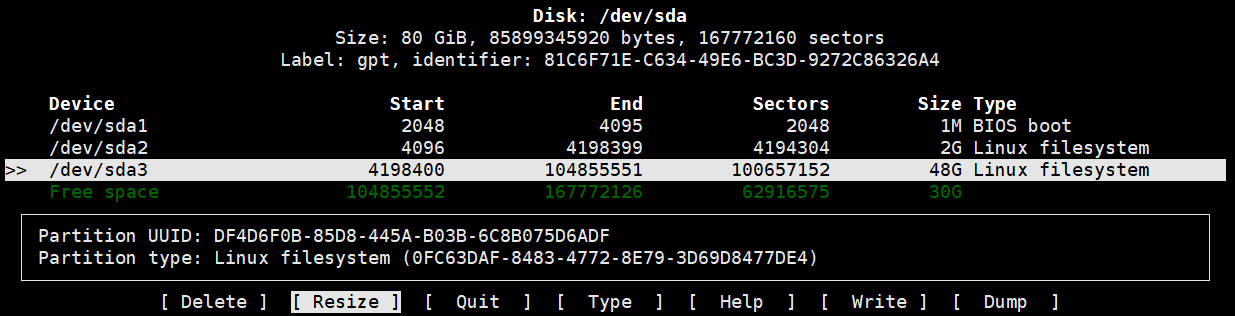
|
||
3. 输入新的分区大小,默认为原大小加上可用空间大小等于 `78G`。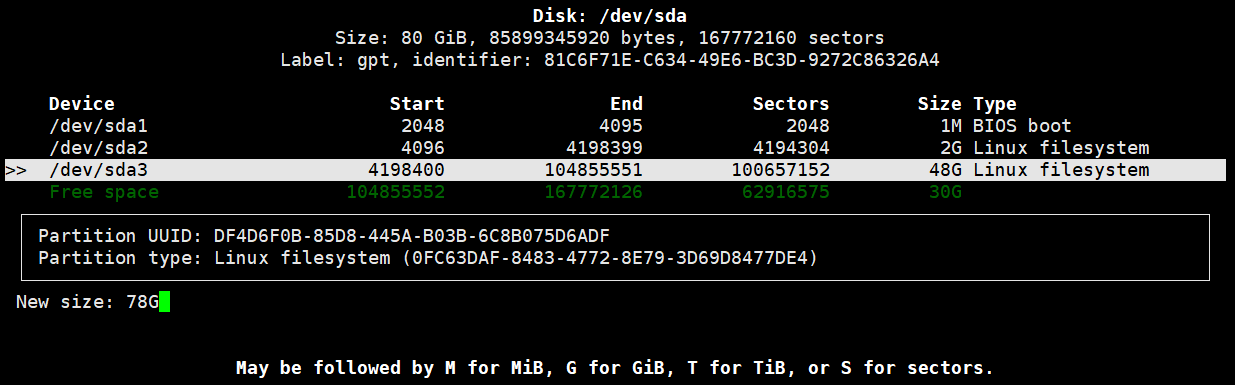
|
||
4. 使用左右方向键选择 `Write` 操作,写入修改。然后输入 `yes` 确认。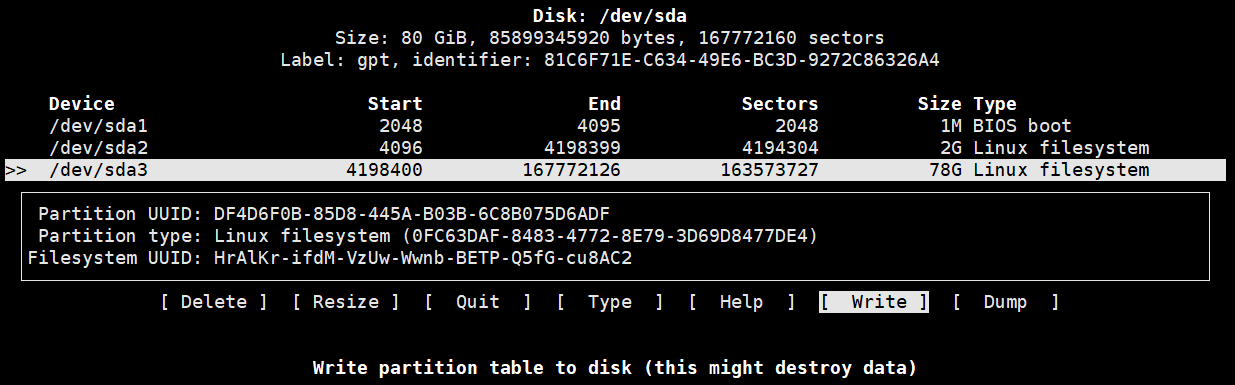
|
||
5. 提示分区表已改变。然后使用左右方向键选择 `Quit` 操作,退出分区管理的交互式界面。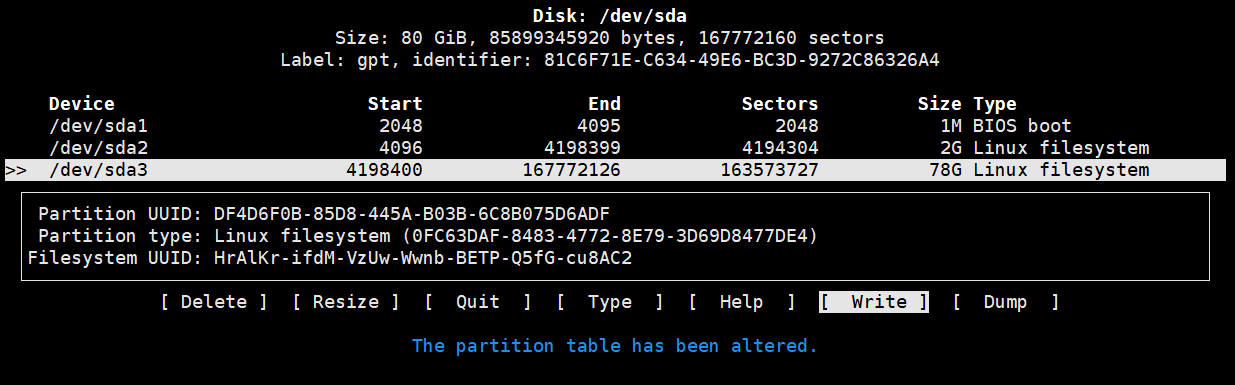
|
||
6. 退出时提示如下。
|
||
|
||
$ sudo cfdisk <br>GPT PMBR size mismatch (104857599 != 167772159) will be corrected by write. <br> <br>Syncing disks.|
|
||
|
||
|
||
#### [](https://www.moralok.com/2024/01/14/increase-disk-space-of-Ubuntu-server-on-VMware-without-using-GParted/#%E8%B0%83%E6%95%B4%E7%89%A9%E7%90%86%E5%8D%B7%E5%A4%A7%E5%B0%8F "调整物理卷大小")调整物理卷大小
|
||
|
||
1. 使用 `sudo pvresize /dev/sda3` 命令调整 `LVM` 中物理卷的大小。
|
||
|
||
|$ sudo pvresize /dev/sda3 <br> Physical volume "/dev/sda3" changed <br> 1 physical volume(s) resized or updated / 0 physical volume(s) not resized|
|
||
|
||
|
||
#### [](https://www.moralok.com/2024/01/14/increase-disk-space-of-Ubuntu-server-on-VMware-without-using-GParted/#%E8%B0%83%E6%95%B4%E9%80%BB%E8%BE%91%E5%8D%B7%E5%A4%A7%E5%B0%8F "调整逻辑卷大小")调整逻辑卷大小
|
||
|
||
1. 使用 `sudo fdisk -l` 命令显示物理卷和逻辑卷的大小差异。在末尾可见 `/dev/sda3` 的大小为 `78G`,`/dev/mapper/ubuntu--vg-ubuntu--lv` 的大小为 `47.102G`。
|
||
|
||
$ sudo fdisk -l <br>Disk /dev/loop0: 63.48 MiB, 66547712 bytes, 129976 sectors <br>Units: sectors of 1 * 512 = 512 bytes <br>Sector size (logical/physical): 512 bytes / 512 bytes <br>I/O size (minimum/optimal): 512 bytes / 512 bytes <br> <br> <br>Disk /dev/loop1: 63.93 MiB, 67014656 bytes, 130888 sectors <br>Units: sectors of 1 * 512 = 512 bytes <br>Sector size (logical/physical): 512 bytes / 512 bytes <br>I/O size (minimum/optimal): 512 bytes / 512 bytes <br> <br> <br>Disk /dev/loop2: 40.88 MiB, 42840064 bytes, 83672 sectors <br>Units: sectors of 1 * 512 = 512 bytes <br>Sector size (logical/physical): 512 bytes / 512 bytes <br>I/O size (minimum/optimal): 512 bytes / 512 bytes <br> <br> <br>Disk /dev/loop3: 91.85 MiB, 96292864 bytes, 188072 sectors <br>Units: sectors of 1 * 512 = 512 bytes <br>Sector size (logical/physical): 512 bytes / 512 bytes <br>I/O size (minimum/optimal): 512 bytes / 512 bytes <br> <br> <br>Disk /dev/loop4: 40.44 MiB, 42393600 bytes, 82800 sectors <br>Units: sectors of 1 * 512 = 512 bytes <br>Sector size (logical/physical): 512 bytes / 512 bytes <br>I/O size (minimum/optimal): 512 bytes / 512 bytes <br> <br> <br>Disk /dev/fd0: 1.42 MiB, 1474560 bytes, 2880 sectors <br>Units: sectors of 1 * 512 = 512 bytes <br>Sector size (logical/physical): 512 bytes / 512 bytes <br>I/O size (minimum/optimal): 512 bytes / 512 bytes <br>Disklabel type: dos <br>Disk identifier: 0x90909090 <br> <br>Device Boot Start End Sectors Size Id Type <br>/dev/fd0p1 2425393296 4850786591 2425393296 1.1T 90 unknown <br>/dev/fd0p2 2425393296 4850786591 2425393296 1.1T 90 unknown <br>/dev/fd0p3 2425393296 4850786591 2425393296 1.1T 90 unknown <br>/dev/fd0p4 2425393296 4850786591 2425393296 1.1T 90 unknown <br> <br> <br>Disk /dev/sda: 80 GiB, 85899345920 bytes, 167772160 sectors <br>Disk model: VMware Virtual S <br>Units: sectors of 1 * 512 = 512 bytes <br>Sector size (logical/physical): 512 bytes / 512 bytes <br>I/O size (minimum/optimal): 512 bytes / 512 bytes <br>Disklabel type: gpt <br>Disk identifier: 81C6F71E-C634-49E6-BC3D-9272C86326A4 <br> <br>Device Start End Sectors Size Type <br>/dev/sda1 2048 4095 2048 1M BIOS boot <br>/dev/sda2 4096 4198399 4194304 2G Linux filesystem <br>/dev/sda3 4198400 167772126 163573727 78G Linux filesystem <br> <br> <br>Disk /dev/mapper/ubuntu--vg-ubuntu--lv: 47.102 GiB, 51535413248 bytes, 100655104 sectors <br>Units: sectors of 1 * 512 = 512 bytes <br>Sector size (logical/physical): 512 bytes / 512 bytes <br>I/O size (minimum/optimal): 512 bytes / 512 bytes|
|
||
|
||
2. 使用 `sudo lvresize -l +100%FREE /dev/mapper/ubuntu--vg-ubuntu--lv` 命令调整逻辑卷的大小。
|
||
|
||
| | |
|
||
|---|---|
|
||
|1 <br>2 <br>3|$ sudo lvresize -l +100%FREE /dev/mapper/ubuntu--vg-ubuntu--lv <br> Size of logical volume ubuntu-vg/ubuntu-lv changed from <48.00 GiB (12287 extents) to <78.00 GiB (19967 extents). <br> Logical volume ubuntu-vg/ubuntu-lv successfully resized.|
|
||
|
||
|
||
### [](https://www.moralok.com/2024/01/14/increase-disk-space-of-Ubuntu-server-on-VMware-without-using-GParted/#%E8%B0%83%E6%95%B4%E6%96%87%E4%BB%B6%E7%B3%BB%E7%BB%9F%E5%A4%A7%E5%B0%8F "调整文件系统大小")调整文件系统大小
|
||
|
||
1. 使用 `sudo resize2fs /dev/mapper/ubuntu--vg-ubuntu--lv` 命令调整文件系统的大小。
|
||
|
||
| | |
|
||
|---|---|
|
||
|1 <br>2 <br>3 <br>4 <br>5|$ sudo resize2fs /dev/mapper/ubuntu--vg-ubuntu--lv <br>resize2fs 1.45.5 (07-Jan-2020) <br>Filesystem at /dev/mapper/ubuntu--vg-ubuntu--lv is mounted on /; on-line resizing required <br>old_desc_blocks = 6, new_desc_blocks = 10 <br>The filesystem on /dev/mapper/ubuntu--vg-ubuntu--lv is now 20446208 (4k) blocks long.|
|
||
|
||
2. 使用 `df -h` 命令显示文件系统的总空间和可用空间信息。确认 `/dev/mapper/ubuntu--vg-ubuntu--lv` 的大小已调整为 `77G`。
|
||
|
||
| | |
|
||
|---|---|
|
||
|1 <br>2 <br>3 <br>4 <br>5 <br>6 <br>7 <br>8 <br>9 <br>10 <br>11 <br>12 <br>13 <br>14 <br>15 <br>16|$ df -h <br>Filesystem Size Used Avail Use% Mounted on <br>udev 7.8G 0 7.8G 0% /dev <br>tmpfs 1.6G 3.1M 1.6G 1% /run <br>/dev/mapper/ubuntu--vg-ubuntu--lv 77G 43G 31G 59% / <br>tmpfs 7.8G 0 7.8G 0% /dev/shm <br>tmpfs 5.0M 0 5.0M 0% /run/lock <br>tmpfs 7.8G 0 7.8G 0% /sys/fs/cgroup <br>vmhgfs-fuse 932G 859G 73G 93% /mnt/hgfs <br>/dev/sda2 2.0G 209M 1.6G 12% /boot <br>/dev/loop0 64M 64M 0 100% /snap/core20/2015 <br>/dev/loop1 64M 64M 0 100% /snap/core20/2105 <br>/dev/loop2 41M 41M 0 100% /snap/snapd/20290 <br>/dev/loop3 92M 92M 0 100% /snap/lxd/24061 <br>/dev/loop4 41M 41M 0 100% /snap/snapd/20671 <br>tmpfs 1.6G 0 1.6G 0% /run/user/1000|
|
||
|
||
|
||
## [](https://www.moralok.com/2024/01/14/increase-disk-space-of-Ubuntu-server-on-VMware-without-using-GParted/#%E5%8F%82%E8%80%83%E6%96%87%E7%AB%A0 "参考文章")参考文章
|
||
|
||
- [Increase disk space on Ubuntu guest VM – no GUI or GParted](https://razvanm.ro/tutorial/increase-disk-space-on-ubuntu-guest-vm-no-gui-or-gparted/#Increase-Physical-Volume)
|
||
|
||
[# linux](https://www.moralok.com/tags/linux/) [# ubuntu](https://www.moralok.com/tags/ubuntu/) |