
114 lines
5.4 KiB
Markdown
114 lines
5.4 KiB
Markdown
|
||
## 摘要
|
||
|
||
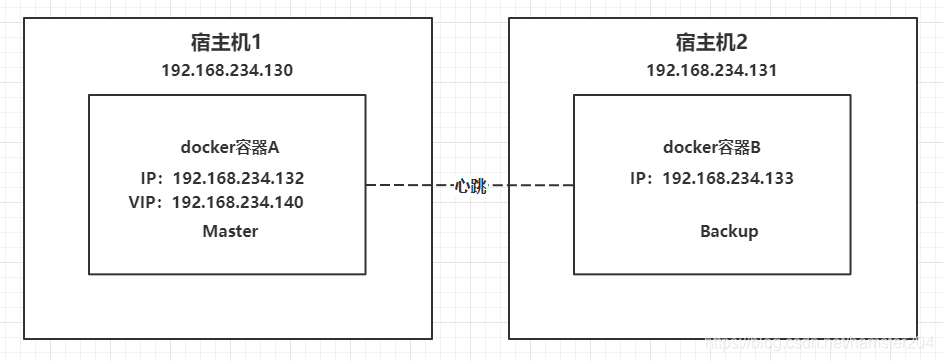
试验由安装了docker的A、B两台电脑完成,在两台电脑上创建docker桥接网络然后依托于网桥在每台电脑中运行一个docker容器,并在容器中安装 keepalived组件,最后采用断网的方式测试虚拟ip的漂移情况。
|
||
|
||
#### (1)软件环境:
|
||
|
||
- 宿主机系统:centos7
|
||
- docker 版本:19.03.0
|
||
- 镜像版本:centos:7
|
||
- keepalived版本:2.0.7
|
||
|
||
#### (2)逻辑环境:
|
||
|
||
| | | | |
|
||
|---|---|---|---|
|
||
|宿主机名|宿主机IP|容器IP|虚拟IP|
|
||
|宿主机1|192.168.234.130|192.168.234.132|192.168.234.140|
|
||
|宿主机2|192.168.234.131|192.168.23|
|
||
|
||
|
||
|
||
## 安装步骤
|
||
|
||
以宿主机1安装步骤为例讲解试验的安装过程
|
||
|
||
#### (1)创建网络和容器
|
||
|
||
**创建网络**
|
||
|
||
docker有**bridge、host、container、none**四种网络模式,其中**bridge**是dokcer网络的默认设置。安装完docker,系统会自动添加一个供docker使用的网桥docker0,我们创建一个新的容器时,容器通过DHCP获取一个与docker0同网段的IP地址。并默认连接到docker0网桥,以此实现容器与宿主机的网络互通。但默认**bridge**网络的IP是172段的,而我们通常需要docker容器可以和局域网中其他机器相互访问,因此我们需要创建指定IP段的自定义**bridge。**
|
||
|
||
> docker network create -d macvlan --subnet=192.168.234.0/24 --gateway=192.168.234.2 -o parent=ens33 mynet
|
||
|
||
- -d 指定 Docker 网络 driver 为macvlan
|
||
- --subnet 指定 macvlan 网络所在的网络段
|
||
- --gateway 指定网关
|
||
- -o parent 指定用来分配 macvlan 网络的物理网卡
|
||
|
||
**创建容器**
|
||
|
||
> docker run -itd --privileged=true --name test --net mynet --ip 192.168.234.132 centos:7 /bin/bash
|
||
|
||
- **-i** 打开STDIN,用于控制台交互
|
||
- **-t** 分配tty设备,该可以支持终端登录,默认为false
|
||
- **-d** 让容器在后台运行
|
||
- **--privileged** 特权模式(默认关闭),用于容器启动后台服务
|
||
- **--net** 指定容器网络
|
||
- **--ip** 指定容器IP
|
||
|
||
**进入容器**
|
||
|
||
> docker exec -it test sh
|
||
|
||
#### (2)安装依赖包
|
||
|
||
> yum install -y curl gcc openssl openssl-devel libnl libnl-devel libnfnetlink-devel
|
||
|
||
#### (3)安装依赖命令
|
||
|
||
> # 安装make编译命令
|
||
>
|
||
> **yum -y install cmake**
|
||
>
|
||
> # 安装ifconfig命令
|
||
>
|
||
> **yum -y install net-tools**
|
||
>
|
||
> # 安装wget命令
|
||
>
|
||
> **yum -y install wget**
|
||
|
||
#### **(4)安装keepalived**
|
||
|
||
```cobol
|
||
#下载安装包 wget http://www.keepalived.org/software/keepalived-2.0.7.tar.gz # 解压缩 tar xvf keepalived-2.0.7.tar.gz cd keepalived-2.0.7 # 设置编译位置 ./configure --prefix=/usr/local/keepalived --sysconf=/etc # 编译安装 make && make install # 将keepalived主程序加入到环境变量 cp /usr/local/keepalived/sbin/keepalived /usr/sbin/keepalived # keepalived启动脚本(源码目录下),放到/etc/init.d/目录下就可以使用service命令便捷调用 cp /usr/local/keepalived-2.0.7/keepalived/etc/init.d/keepalived /etc/init.d/keepalived
|
||
```
|
||
|
||
#### (5)**配置keepalived.conf**
|
||
|
||
**vi /etc/keepalived/keepalived.conf**
|
||
|
||
```cobol
|
||
global_defs { notification_email { …… } … vrrp_strict # 此配置注释掉后外界才能ping通虚拟IP ……} vrrp_instance VI_1 { state MASTER #主从标识MASTER/BACKUP interface ens33 # 网卡 virtual_router_id 51 #路由ID主从必须一致 priority 101 # 权重用于选举 advert_int 1 # 1代表1秒检查一次 authentication { auth_type PASS auth_pass 1111 } virtual_ipaddress { 192.168.234.140 # 虚拟IP }}
|
||
```
|
||
|
||
#### **(6)配置启动命令**
|
||
|
||
> # 安装service命令
|
||
> **yum install initscripts -y**
|
||
> # 添加service 命令
|
||
> **chkconfig --add keepalived**
|
||
|
||
#### **(7)启动keepalived**
|
||
|
||
> # 启动服务
|
||
> **service keepalived start|stop**
|
||
|
||
```cobol
|
||
sh-4.2# service keepalived startFailed to get D-Bus connection: Operation not permitted Starting keepalived: [ ok ]
|
||
```
|
||
|
||
> # 查看虚拟ip命令
|
||
> **ip addr show eth0**
|
||
|
||
```cobol
|
||
sh-4.2# ip addr show eth021: eth0@if2: <BROADCAST,MULTICAST,UP,LOWER_UP> mtu 1500 qdisc noqueue state UP group default link/ether 02:42:c0:a8:ea:84 brd ff:ff:ff:ff:ff:ff link-netnsid 0 inet 192.168.234.132/24 brd 192.168.234.255 scope global eth0 valid_lft forever preferred_lft forever inet 192.168.234.140/32 scope global eth0 valid_lft forever preferred_lft forever
|
||
```
|
||
|
||
## 总结
|
||
|
||
到此宿主机1的安装已完成,宿主机2的安装与其安装过程完全相同(注意keepalived.conf配置),在keepalived中我将宿主机1运行容器安装的keepalived设置为MASTER而宿主机2运行容器安装的keepalived设置为BACKUP,正常启动情况下虚拟IP 140 绑定在MASTER网卡上,当我将宿主机1关闭容器的情况下,BACKUP会自动获取虚拟IP 140 而当MASTER再次启动时虚拟IP会自动回到MASTER,以上就是我使用docker容器测试keepalived高可用的过程,希望对有需要的同学有用。
|
||
|
||
(补充:我尝试过使用host方式运行keepalived,但当关闭容器时宿主机虚拟IP不会在本机下载掉造成双虚拟IP在线也就是脑裂现象。) |