
104 lines
7.2 KiB
Markdown
104 lines
7.2 KiB
Markdown
#### **实现方案**
|
||
|
||
实现这个很简单,只需要完成下面两步:
|
||
|
||
1. 想办法将 Class 加载到 JVM
|
||
|
||
2. 使 Spring 扫描到 Class
|
||
|
||
|
||
有时候java中的各种框架以及复杂的概念源码给我们造成了很大理解障碍,特别是Spring家族的所以先想清楚大致实现步骤比较好
|
||
|
||
#### **将Class加载到JVM**
|
||
|
||
现在我们设定需要加载的 Jar 在 `/user/local/java/plugins` 目录下,对于第 1 步,现在有如下几种实现方式:
|
||
|
||
1. 扩大 `-cp` 由 `AppClassLoader` 帮我们加载外部 Jar
|
||
|
||
2. 使用 SpringBoot 提供的启动参数 `loader.path` 实现
|
||
|
||
3. 自定义 `classloader` 实现加载指定位置的 Jar
|
||
|
||
|
||
其中 1 和 3 是JDK提供的方案,2是 SpringBoot 扩展的方案,毕竟 SpringBoot 也需要自定义加载很多类顺带扩展了一个参数出来
|
||
|
||
##### **方案1:扩大 -cp 由 AppClassLoader 帮我们加载外部 Jar**
|
||
|
||
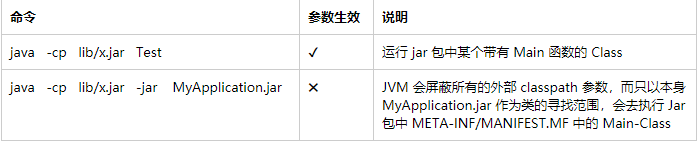
可以使用 `classpath` 指定类加载的路径,但 `classpath` 的生效是有条件的,这里其实对应了 Jar 包的两种启动方式:通过Jar包里的Main函数启动或者运行Jar启动
|
||
|
||
|
||
|
||
图片
|
||
|
||
SpringBoot 打包后 `MANIFEST.MF` 内容如下:
|
||
|
||
`Manifest-Version: 1.0 Created-By: Maven JAR Plugin 3.2.2 Build-Jdk-Spec: 18 Implementation-Title: intelligent-soul Implementation-Version: 0.0.1-SNAPSHOT Main-Class: org.springframework.boot.loader.JarLauncher Start-Class: com.test.MyApplication Spring-Boot-Version: 2.6.15 Spring-Boot-Classes: BOOT-INF/classes/ Spring-Boot-Lib: BOOT-INF/lib/ Spring-Boot-Classpath-Index: BOOT-INF/classpath.idx Spring-Boot-Layers-Index: BOOT-INF/layers.idx `
|
||
|
||
所以需要使用 Main 函数启动的方式,不能使用之前的常用的 Jar 包启动方式了。对于 SpringBoot 应用 `Main-Class` 是 `JarLauncher` 所以此时启动命令要改成
|
||
|
||
`java -cp /user/local/java/plugins org.springframework.boot.loader.JarLauncher `
|
||
|
||
- 优点:实现简单
|
||
|
||
- 缺点:每个 Jar 包启动命令都一样了,不好区分
|
||
|
||
|
||
##### **方案2:使用SpringBoot扩展的启动参数,使用java -jar 配合Loader.path参数**
|
||
|
||
因为 Spring Boot 程序大多是打成 Jar 包,使用 `java -jar boot.jar` 的方式启动 (此时 `-cp` 无效),可以使用 `loader.path` 指定类加载路径加载其他 Jar,但 `loader.path` 生效也是有条件的:
|
||
|
||

|
||
|
||
图片
|
||
|
||
SpringBoot 默认打包方式的`Main-Class`是`JarLauncher`
|
||
|
||
**配置 Main-Class**
|
||
|
||
为了使 `loader.path` 参数生效需要生成 Jar 包的 `Main-Class` 项配置为 `PropertiesLauncher`,在 `maven` 中如下配置,可参考 `Using the PropertiesLauncher`:
|
||
|
||
`<build> <plugins> <plugin> <groupId>org.springframework.boot</groupId> <artifactId>spring-boot-maven-plugin</artifactId> <configuration> <!-- 打包时排除scope为system的包 --> <includeSystemScope>false</includeSystemScope> <!-- jvm启动时通过-Dloader.path加载包,必须指定layout为ZIP,否则-Dloader.path无效!!! --> <layout>ZIP</layout> </configuration> <executions> <execution> <goals> <goal>repackage</goal> </goals> </execution> </executions> </plugin> </plugins> <finalName>Test</finalName> </build> `
|
||
|
||
其中 layout 可配置值如下:
|
||
|
||
1、**JAR**,即通常的可执行 jar
|
||
|
||
`Main-Class: org.springframework.boot.loader.JarLauncher `
|
||
|
||
2、**WAR**,即通常的可执行war,需要的 servlet 容器依赖位于 `WEB-INF/lib-provided`
|
||
|
||
`Main-Class: org.springframework.boot.loader.WarLauncher `
|
||
|
||
3、**ZIP**,即DIR,类似于 JAR
|
||
|
||
`Main-Class: org.springframework.boot.loader.PropertiesLauncher `
|
||
|
||
4、**MODULE**,将所有的依赖库打包(`scope`为`provided`的除外),但是不打包 Spring Boot 的任何`Launcher`
|
||
|
||
5、**NONE**,将所有的依赖库打包,但是不打包 Spring Boot 的任何 `Launcher`
|
||
|
||
无论启动类是 `JarLauncher` 或者 `PropertiesLauncher`,`loader.path` 引入的 Jar 和 Spring Boot jar 包中 `BOOT-INFO/lib` 包下 Jar 都是使用类加载器 `org.springframework.boot.loader.LaunchedURLClassLoader` 进行加载,也就是说他们使用的是同一个类加载器。这个类加载器主要就是负责加载 Jar 包里的 Jar 的加载,因为JDK没有实现该功能所以 SpringBoot 定义了该类
|
||
|
||
注意到同一个程序,打包成不同类型时,`PropertiesLauncher (20s)` 比 `JarLauncher (8s)` 启动慢很多。
|
||
|
||
##### **方案3:自定义类加载器,加载固定目录下的jar包或者读取环境变量路径**
|
||
|
||
这种方式需要程序启动的某个节点,调用自定义类加载器去加载指定目录下的 Jar 包,时间点不是很好控制。但这个定制化程度比较高。
|
||
|
||
`//可以在这里调用自定义类加载 SpringApplication.run(SpringBootDemo.class, args); `
|
||
|
||
##### **方案4:通过设置-Xbootclasspath/a或者 Extention ClassLoader通过改变参数java.ext.dirs实现**
|
||
|
||
会改变系统类加载器加载行为不安全不推荐!!!
|
||
|
||
#### **加载后的类如何扫描进入Spring容器**
|
||
|
||
对于业务 Jar 包类,可以预先在SpringBoot中指定好扫描包路径,那么只需要插件包路径是`com.demo`开头即可,如下
|
||
|
||
`@SpringBootApplication(scanBasePackages = {"com.demo"}) public class SpringBootDemoApplication { public static void main(String[] args) { SpringApplication.run(SpringBootDemoApplication.class, args); } `
|
||
|
||
如不符合包名前缀一致的情况,需要在jar包`META-INF`下的`spring.factories`指定好自动装配的类即可如 mybatis-plus:
|
||
|
||
`# Auto Configure org.springframework.boot.env.EnvironmentPostProcessor=\ com.baomidou.mybatisplus.autoconfigure.SafetyEncryptProcessor org.springframework.boot.autoconfigure.EnableAutoConfiguration=\ com.baomidou.mybatisplus.autoconfigure.IdentifierGeneratorAutoConfiguration,\ com.baomidou.mybatisplus.autoconfigure.MybatisPlusLanguageDriverAutoConfiguration,\ com.baomidou.mybatisplus.autoconfigure.MybatisPlusAutoConfiguration `
|
||
|
||
👉 欢迎[加入小哈的星球](https://mp.weixin.qq.com/s?__biz=MzU4MDUyMDQyNQ==&mid=2247538511&idx=1&sn=c2f80c1f6143af7bfcaa661951d7bf23&chksm=fd5787c9ca200edf9b861f51dcdc6e15a575488ab6be0f5b721ea27047cf3316e07ea33a9a8d&token=343952052&lang=zh_CN&scene=21#wechat_redirect),你将获得: **专属的项目实战(多个项目) / 1v1 提问 / **Java 学习路线 /** 学习打卡 / 每月赠书 / 社群讨论** |